In this part of the Deploying Micro-services using Kubernetes tutorial, we will deploy the the micro-service using Kubernetes. Please see PART 1 for details of the micro-service, the architecture and the various applications and services that it comprises of.
Prerequisite:
- Install Kubectl (Command line utility) Follow instructions from: https://kubernetes.io/docs/tasks/tools/install-kubectl/
- Install Minikube for running 1-node Kubernetes environment Following instructions from: https://minikube.sigs.k8s.io/docs/start/
After the installation is complete, you can verify by using the following commands:
kubectl version

minikube version

#If both the commands return fine, the installation is successful.
# At this point we can start the minikube, which provides up with a Single Node Kubernetes environment.

minikube start
You should have output like: 🎉 minikube 1.17.1 is available! Download it: https://github.com/kubernetes/minikube/releases/tag/v1.17.1 💡 To disable this notice, run: 'minikube config set WantUpdateNotification false' 🙄 minikube v1.6.2 on Darwin 10.14.5 ✨ Selecting 'hyperkit' driver from existing profile (alternates: [virtualbox]) 💡 Tip: Use 'minikube start -p ' to create a new cluster, or 'minikube delete' to delete this one. 🔄 Starting existing hyperkit VM for "minikube" … ⌛ Waiting for the host to be provisioned … 🐳 Preparing Kubernetes v1.17.0 on Docker '19.03.5' … 🚀 Launching Kubernetes … 🏄 Done! kubectl is now configured to use "minikube"
Let’s check our Kubernetes environment, existing Pods, Services and Deployments etc. If this is a new Minikube installation, you should just have Kubernetes service and one node.
# Check the nodes
kubectl get nodes

NAME       STATUS   ROLES    AGE     VERSION
minikube   Ready    master   3d22h   v1.17.0

# Check namespaces, At this point we only have namespaces created by Kubernetes
kubectl get namespaces

NAME              STATUS   AGE
default           Active   3d22h
kube-node-lease   Active   3d22h
kube-public       Active   3d22h
kube-system       Active   3d22h

# Check the pods
kubectl get pods

No resources found in default namespace.

# Check the deployments
kubectl get deployments

No resources found in default namespace.

# Check the Services
kubectl get services

NAME         TYPE        CLUSTER-IP   EXTERNAL-IP   PORT(S)   AGE
kubernetes   ClusterIP   10.96.0.1    <none>        443/TCP   3d22h
Create Kubernetes Artifacts
In this section, we will create the pods and services needed to deploy our micro service. Let’s start by creating a directory / folder to save our files. There are 2 ways to create these in Kubernetes, Imperative way (Using the command line, but gets difficult to manage for larger applications), and Declarative way where we use YAML files. We will follow the declarative approach, so we can check them in version control system like Git, SVN or CodeCommit etc, share and collaborate with other team members.
Create New Namespace: By default all the components like pods, services etc are deployed in default namespace.To keep the Kubernetes cluster organized, we will deploy the pods and services in it’s own namespace called voting. Create a new file called namespace.yaml with the following code:
apiVersion: v1
kind: Namespace
metadata:
  name: voting
Create Redis Pod: The voting application writes data to the Redis in-memory cache. Create a file called redis-pod.yaml with the following code. As you noticed that I have provided labels under the meta data. This will be helpful when we create the Services.
apiVersion: v1
kind: Pod
metadata:
  name: redis-pod
  namespace: voting
  labels:
    name: redis-pod
    app: demo-voting-app

spec:
  containers:
    - name: redis
      image: redis:latest
      ports:
        - containerPort: 6379
Create Redis Service: In Kubernetes, when a pod is destroyed / recreated its IP address changes. If the calling application refer to the pod using it’s IP Address, then the calling application will break unless they keep making the changes every time. To prevent this, we expose the Pods using Service. The calling application points to the service, which points to POD(s). Let’s create redis-service.yaml file with the following code. The Service exposes the Redis with name “redis” (Please see Part 1, on why it has to be named redis) and “selector” section under the spec, has name and app that we specified in the POD’s meta data. This is how Service knows which PODs to target.
apiVersion: v1
kind: Service
metadata:
  name: redis
  namespace: voting
  labels:
    name: redis-service
    app: demo-voting-app
spec:
  ports:
    - port: 6379
      name: redis-service
      targetPort: 6379
  selector:
    name: redis-pod
    app: demo-voting-app
Create Db Pod: The application uses Postgres SQL database to persist user votes. Create a file named db-pod.yaml with following code:
apiVersion: v1
kind: Pod
metadata:
  name: db-pod
  namespace: voting
  labels:
    name: db-pod
    app: demo-voting-app
spec:
  containers:
    - name: db-pod
      image: postgres:9.4
      env:
        - name: POSTGRES_USER
          value: "postgres"
        - name: POSTGRES_PASSWORD
          value: "postgres"
        - name: POSTGRES_HOST_AUTH_METHOD
          value: trust
      ports:
        - containerPort: 5432
Create DB Service: As before, we expose the database as service to the other clients, in this case worker and results web application. Create a file named db-service.yaml with the following code:
apiVersion: v1
kind: Service
metadata:
  name: db
  namespace: voting
  labels:
    name: db-service
    app: demo-voting-app
spec:
  ports:
    - port: 5432
      targetPort: 5432
  selector:
    name: db-pod
    app: demo-voting-app
Create Worker Pod: As mentioned in Part 1, the worker is an application that reads from Redis and writes data to Postgres SQL database. For the worker, we will only create a pod, as there is no client connecting to it, rather the worker connects to both “redis” and “db” services. Create worker-pod.yaml with the following code. Since we do not expose this as a service, the ports are not needed under the spec section.
apiVersion: v1
kind: Pod
metadata:
  name: worker-app-pod
  namespace: voting
  labels:
    name: worker-app-pod
    app: demo-voting-app
spec:
  containers:
  - name: worker-app
    image: dockersamples/examplevotingapp_worker
Create Voting App Pod: Voting web application is written in Python. It writes the votes casted into the Redis in-memory cache. Create a file named voting-app-pod.yaml with the following:
apiVersion: v1
kind: Pod
metadata:
  name: voting-app-pod
  namespace: voting
  labels:
    name: voting-app-pod
    app: demo-voting-app
spec:
  containers:
    - name: voting-app-pod
      image: dockersamples/examplevotingapp_vote
      ports:
        - containerPort: 80
Create Voting App Service: This is needed to expose the voting app POD as a service, thus exposing the web application. Create a file named voting-app-service.yaml with the following. Since we are deploying this locally, we chose type as NodePort, which exposes the service on a random port on the Node. When we deploy this micro service to AWS EKS, we will change this to LoadBalancer. Also check the selector section that matches Service to Pods based on name and app.
apiVersion: v1
kind: Service
metadata:
  name: voting-app-service
  namespace: voting
  labels:
    name: voting-app-service
    app: demo-voting-app
spec:
  type: NodePort
  ports:
    - port: 80
      targetPort: 80
  selector:
    name: voting-app-pod
    app: demo-voting-app
Create Results App Pod: Result web application is written in Node JS. It reads the casted votes data from the Postgres SQL database. Create a file named results-app-pod.yaml with the following:
apiVersion: v1
kind: Pod
metadata:
  name: result-app-pod
  namespace: voting
  labels:
    name: result-app-pod
    app: demo-voting-app
spec:
  containers:
  - name: result-app
    image: dockersamples/examplevotingapp_result
    ports:
     - containerPort: 80
Create Results App Service: This is needed to expose the results app POD as a service, thus exposing the web application. Create a file named results-app-service.yaml with the following. Check the selector section that matches Service to Pods based on name and app.
apiVersion: v1
kind: Service
metadata:
  name: result-service
  namespace: voting
  labels:
    name: result-service
    app: demo-voting-app
spec:
  type: NodePort
  ports:
  - port: 80
    targetPort: 80
  selector:
     name: result-app-pod
     app: demo-voting-app
Caution: If you copy paste the code from this page to create the YAML files, please make sure the indentation is preserved.
All our YAML files are created and we should be ready to deploy this. You can deploy them one at a time, in the same order that we used to create them Or you can run kubectl apply command to execute all the files from the directory and kubernetes will identify the dependencies and deploy them in appropriate order.
To Deploy one file at a time, Open a terminal, change the working directory to the location where you created the files, and run the following commands:
# Create namespace
kubectl apply -f namespace.yaml

# Verify the created namespace by running
kubectl get namespaces

# Create Redis pod
kubectl apply -f redis-pod.yaml

# Verify the redis pod is created in the voting namespace
kubectl get pods -n voting

# Create Redis Service
kubectl apply -f redis-service.yaml

# Verify the redis service is created in the voting namespace
kubectl get services -n voting

# Create DB pod
kubectl apply -f db-pod.yaml

# Verify the db pod is created in the voting namespace
kubectl get pods -n voting

# Create DB Service
kubectl apply -f db-service.yaml

# Verify the db service is created in the voting namespace
kubectl get services -n voting

# create voting app and results app pods
kubectl apply -f voting-app-pod.yaml
kubectl apply -f result-app-pod.yaml

# Verify the web application pods are created in the voting namespace
kubectl get pods -n voting

# Create Web application Services
kubectl apply -f voting-app-service.yaml
kubectl apply -f result-app-service.yaml

# Verify the web application services are created in the voting namespace
kubectl get services -n voting

# Create worker pod
kubectl apply -f worker-pod.yaml

# Verify the worker pod is created in the voting namespace
kubectl get pods -n voting
Alternatively, being in the same directory where the files are, you can run kubectl apply -f . command to run them all at once.
Run the following command to see all the pods and services running in “voting” namespace:
kubectl get po,svc -n votingNAME READY STATUS RESTARTS AGE pod/db-pod 1/1 Running 0 2m20s pod/redis-pod 1/1 Running 0 3m31s pod/result-app-pod 1/1 Running 0 3m31s pod/voting-app-pod 1/1 Running 0 3m30s pod/worker-app-pod 1/1 Running 0 55s NAME TYPE CLUSTER-IP EXTERNAL-IP PORT(S) AGE service/db ClusterIP 10.96.6.69 5432/TCP 103s service/redis ClusterIP 10.96.199.243 6379/TCP 3m31s service/result-service NodePort 10.96.186.119 80:32329/TCP 3m30s service/voting-app-service NodePort 10.96.127.28 80:31955/TCP 3m30s
If you see like above, all your services and pods are successfully created. If there is an error creating a pod, try to delete and recreate. To delete and recreate a pod:
# (Just an example to delete and recreate worker-app-pod)

kubectl delete pod worker-app-pod -n voting.

then run

kubectl apply -f worker-pod.yaml
Accessing the Web Applications: Since we are using a single node kubernetes cluster (MiniKube), and exposing the Web application services using NodePort, we need to find which ports are mapped to the web applications. To find the end points, please run the following commands on the terminal:
minikube service list

The command lists all the services running on the MiniKube. It outputs the following:
|-------------|--------------------|---------------------------|-----|
|  NAMESPACE  |        NAME        |        TARGET PORT        | URL |
|-------------|--------------------|---------------------------|-----|
| default     | kubernetes         | No node port              |
| kube-system | kube-dns           | No node port              |
| voting      | db                 | No node port              |
| voting      | redis              | No node port              |
| voting      | result-service     | http://192.168.64.6:32329 |
| voting      | voting-app-service | http://192.168.64.6:31955 |
|-------------|--------------------|---------------------------|-----|


-- OR you can find the url using the service name --
minikube service voting-app-service -n voting --url

minikube service result-service -n voting --url
After all the pods and services are running, you can access the applications as follows:
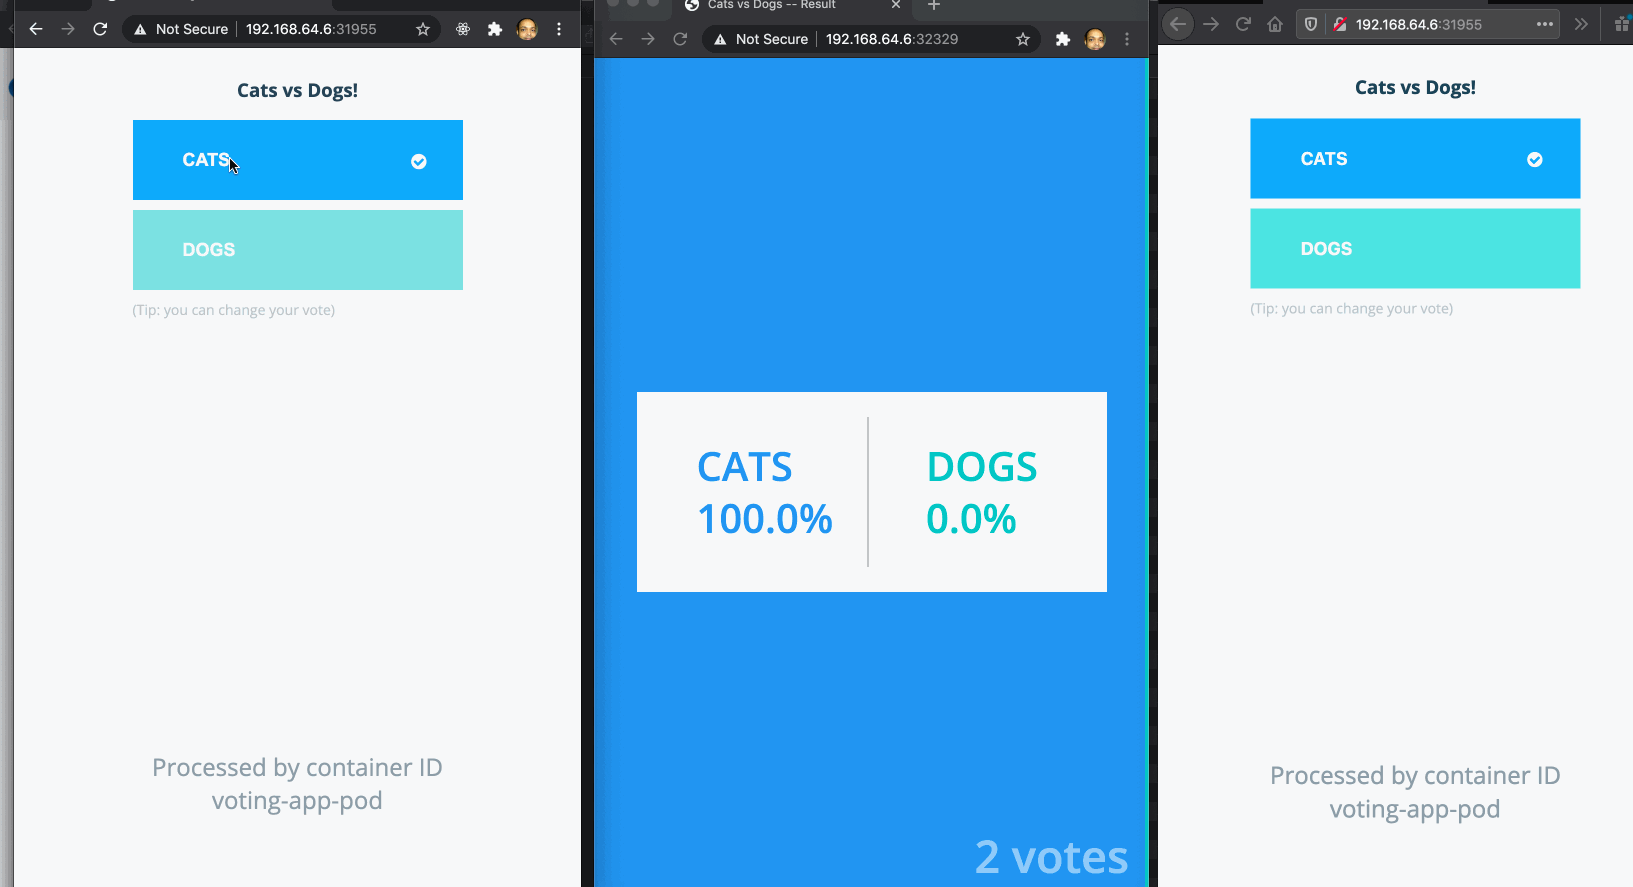
- Voting Web App: http://192.168.64.6:31955
- Results Web App: http://192.168.64.6:32329
As you cast vote on the voting app, the results are updated in almost real time.
As we see, the service works fine, but what happens when we kill a pod or the pod is removed due to system error etc.. If we kill the voting app pod, we can not access the web app. If we kill the worker pod, the Postgres SQL DB stops getting any updates. Ofcourse, that’s not how we want our applications to work. How do we fix that? In the Next part of the series, we will improve upon this by deploying the micro-service using kubernetes deployments, instead of pods and see the advantages that it offers.
Pingback: best prices on generic enclomiphene
Pingback: medicament kamagra pharmacie vente acheter ou
Pingback: discount androxal usa generic
Pingback: dutasteride with no r x and free shipping
Pingback: buy cheap flexeril cyclobenzaprine generic for sale
Pingback: purchase gabapentin no prescription mastercard
Pingback: buying fildena where to purchase
Pingback: order itraconazole in chicago with no prescription
Pingback: how to order staxyn cheap in canada
Pingback: cheapest buy avodart canada internet
Pingback: xifaxan usa where to buy
Pingback: cheapest buy rifaximin purchase toronto
Pingback: kamagra bez lékařského předpisu levné