In this tutorial, we will understand and deploy micro-service built using docker containers in a few different ways:
- Using Docker Commands and link various containers
- Create and deploy docker containers using PODs and Services in Kubernetes on MiniKube locally
- Change the config files to use Kubernetes Deployments (instead of pods) and redeploy on MiniKube locally.
- Deploy to Amazon EKS with Load Balancer for both client facing application (voting and results)
Application Architecture
For this micro service, we will use prebuilt docker images provided by Docker Samples. The application source code can be found at: https://github.com/dockersamples/example-voting-app
This is a simple multi tiered voting application that uses different coding languages like Python, .Net and Node JS. It’s simple enough to not divert the attention from the task (deploy) in hand, yet complicated enough to ensure that all the services are correctly linked and exposed (internally or to the end users). The application has following components (built in separate docker containers).
- A front-end web-app written in Python that let’s you vote between 2 options (Cats / Dogs)
- A Redis in-memory caching layer that collects and queues the vote
- A Worker application written in .Net that consumes the votes and persist them on database
- A Postgres database backed by docker volume
- A Node JS web-app polling the database and showing the votes in real-time

As shown above, the end user access the voting web application (written in python) to cast vote(s). The application writes to an in-memory cache engine, built by Redis container, which is then read by a worker application (.Net) and persisted on the Postgres database. Another web application, result app (written in Node JS), exposes the data from Postgres database to the end user. As you can see, we can imagine, that multiple teams with different skillset working on several different components.
Step1: Deploy with Docker commands
Assuming that you have docker installed locally. If not, please follow instructions from https://docs.docker.com/get-docker/ to install. Also make sure you have an account at https://hub.docker.com.
# We will download the images from docker.
# On the terminal window, run (if not already logged in)
docker login
# Run the following docker commands to download the images, link and run them
#1 Run the Redis container
docker run -d --name=redis redis
#2 Run the Postgres Sql Db container
docker run -d --name=db postgres:9.4
#3 Create the voting front-end app.
# This will run the voting front end app exposed on port 5000 on host computer.
# The docker container exposes the application on port 80.
docker run -d --name=vote --link redis:redis -p 5000:80 dockersamples/examplevotingapp_vote
#4 Create the result front-end app.
# This will run the results front end app exposed on port 5001 on host computer.
# The docker container exposes the application on port 80.
docker run -d --name=result --link db:db -p 5001:80 dockersamples/examplevotingapp_result
#5 Create the workers container. This container need to connect to both redis and postgres sql database.
docker run -d --name=worker --link db:db --link redis:redis dockersamples/worker
#6 Check if all the containers are running
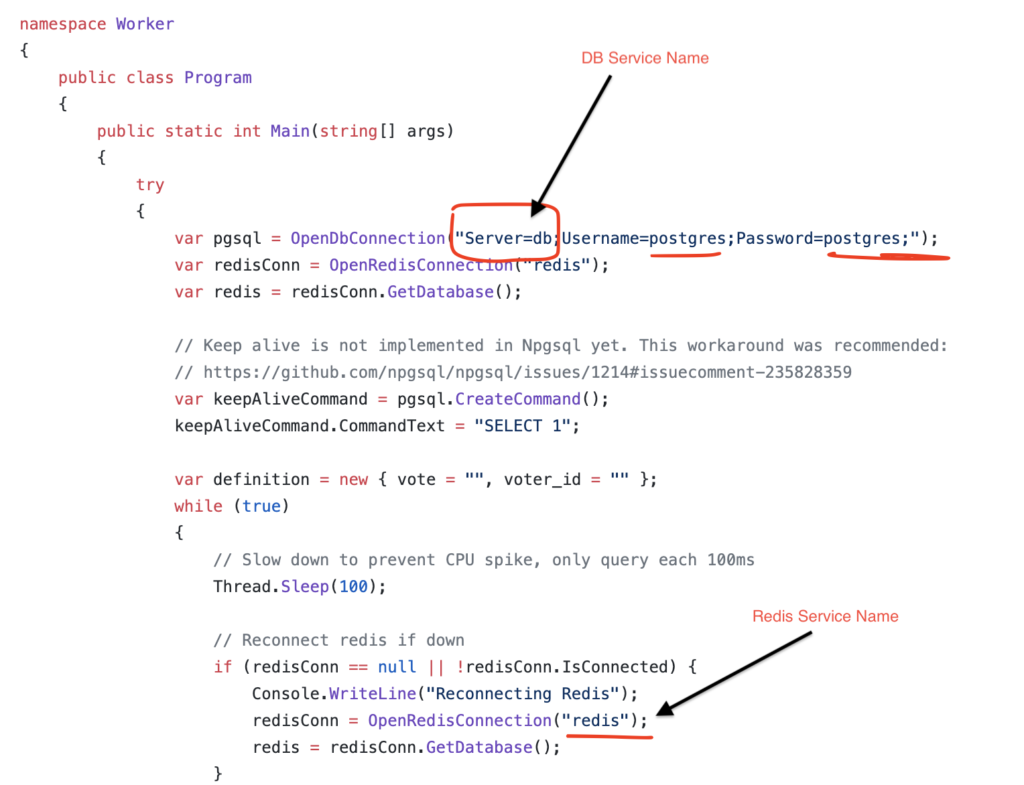
docker psWhy did we choose the name of the containers db and redis?
We chose the names because the application hard coded those names as shown in the screen shot below. This is not best practice to hardcode the names, rather read from the configuration file. But for the purpose of demo, it works fine. Here is workers file snippet screenshot.
Why did we not put port-mapping on all the containers? We only need to specify the port mapping on containers, where we want to have a different host port connecting to the exposed container port. In case of Redis and Postgres SQL DB, the container exposed 6439 and 5432 respectively and the host uses the same ports. In case of the web applications, each container exposes port 80. The host can not have one port (80 in this case) mapped to 2 separate containers, hence on the host we added a port mapping of 5000 and 5001 to point to specific container and container port 80.
After all the containers are running, you can access the applications as follows:
- Voting Web App: http://localhost:5000/
- Results Web App: http://localhost:5001/
As you cast vote on the voting app, the results are updated in almost real time.
In the next step, we will deploy the same micro service on MiniKube.
Pingback: MyBlog
Pingback: buy cheap enclomiphene generic uk
Pingback: acheter kamagra pharmacie vente achat
Pingback: online order androxal generic canada
Pingback: discount flexeril cyclobenzaprine usa seller
Pingback: how to buy fildena cheap generic uk
Pingback: order gabapentin buy online usa
Pingback: buy itraconazole no prescription usa
Pingback: buying staxyn generic uae
Pingback: ordering avodart generic avodart
Pingback: cheap rifaximin cheap with prescription
Pingback: ordering xifaxan price dubai
Pingback: kanada lékárna kamagra generické